
If you have ever stood in an auto parts aisle staring at rows of H4 headlight bulbs, wondering what actually separates a good one from a bad one, you are not alone. The H4 bulb specification has been around for decades, yet most drivers still do not understand what makes it work—or why their upgrades fail. This guide walks through the engineering, the installation, and the real-world performance factors that actually matter.
What Exactly Is an H4 Headlight Bulb?
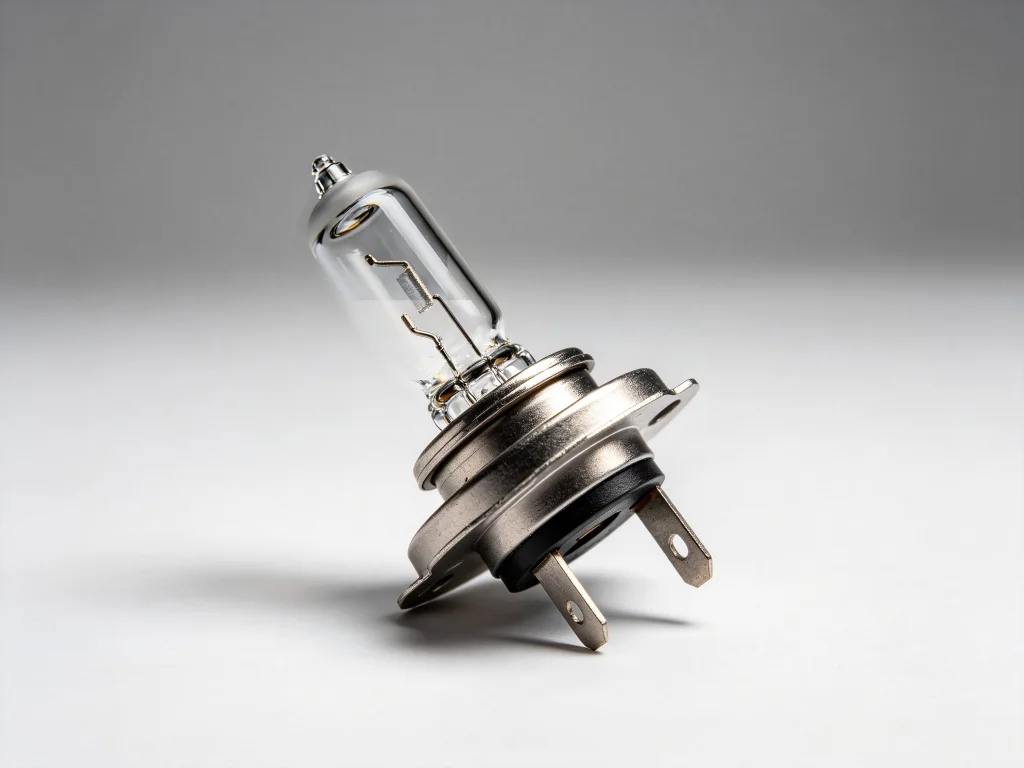
The H4 bulb is a dual-filament halogen lamp with a P43t base that combines both low and high beams in a single unit. The P43t base features three prongs—one for ground, one for low beam, and one for high beam—that sit inline with the bulb and plug into a compatible socket. This three-prong design is what makes the H4 instantly recognizable and why it cannot be interchanged with single-filament bulbs like H7.
Standard H4 halogen bulbs typically produce around 1,000 to 1,500 lumens and run at 55 watts for low beam and 60 watts for high beam. The dual-filament design means the bulb handles both lighting functions from a single housing, which is why it remains popular in older vehicles, motorcycles, and off-road applications.
Here is what many drivers do not realize: the H4 specification is actually regulated under international standards. UNECE Regulation No. 37 defines the technical requirements for filament lamps including the H4 category, covering size, shape, and performance specifications. UNECE Regulation No. 20 specifically addresses headlamps equipped with H4 halogen lamps. These regulations exist because headlight performance is not just about brightness—it is about directing light where it belongs.
Understanding the H4 Socket and Wiring
The H4 socket uses a P43t base configuration, which means the bulb locks into place with three alignment tabs positioned at 12 o’clock, 3 o’clock, and 9 o’clock. This precise positioning is critical because the reflector in your headlight housing is engineered to the exact location of the halogen filaments.
When you look at the back of an H4 connector, the wiring follows a consistent pattern. The top pin typically carries the low beam circuit, the left pin is common ground, and the right pin handles the high beam. Wire colors vary by manufacturer, but the layout remains the same. Understanding this matters because LED bulbs are polarity-sensitive—unlike halogens, which work regardless of which way you plug them in. If your new H4 LED does not light up, flipping the connector 180 degrees often solves the problem.
Halogen vs. LED: What the Data Actually Shows
The marketing claims around H4 LED upgrades can be overwhelming. Some brands promise 20,000 lumens or more. Here is what peer-reviewed research and real-world testing reveal.
| Parameter | H4 Halogen | H4 LED (Quality) | Difference |
|---|---|---|---|
| Power consumption | 55–60W | ~20W | ~3x lower |
| Luminous flux | 1,000–1,500 lm | 2,500–4,700+ lm | 2–3x higher |
| Color temperature | ~3,200K (yellow) | 5,700–6,500K (white/blue) | Whiter light |
| Lifespan | 400–1,000 hours | 30,000–50,000 hours | 30–50x longer |
Academic research published in Transport Problems journal found that LED headlamps produce about 10–15% higher light output while consuming roughly 3.9 times less power than halogen equivalents. The study also confirmed that the light output of an H4 LED high beam is practically comparable to a standard halogen lamp, but with nearly three times lower power consumption.
However—and this is a critical distinction—lumen ratings alone do not tell the full story. One Norton Owners Club member tested a £8.89 H4 LED bulb advertised at 900 lumens. While the bulb consumed just 4 watts, the beam pattern was “non-existent—a complete spread of light in all directions on dip and main.” A bulb that scatters light everywhere is less useful than a lower-lumen bulb that puts light exactly where it needs to go.
The Installation Process: What to Expect
Installing an H4 bulb is straightforward, but there are several steps where mistakes commonly happen. Here is the sequence:
- Disconnect the battery – Always start by disconnecting the negative terminal to prevent electrical shorts.
- Access the headlight housing – Open the hood and locate the rear of the headlight assembly. You may need to remove trim panels or move other components for access.
- Unplug the factory connector – Reach behind the headlamp and unplug the three-pin connector.
- Remove the dust cap – Peel back the rubber dust boot to expose the bulb retainer.
- Release the spring clip – Unclip the wire retainer that holds the bulb in place.
- Remove the old bulb – Withdraw the old H4 bulb without touching the glass. Use gloves or a clean tissue—oil from your skin can create hot spots that shorten bulb life.
- Install the new bulb – Insert the new H4 bulb with the locating tabs aligned correctly (12/3/9 positions). Secure it with the retaining clip.
- Reconnect and test – Refit the dust cap and connector, then test both low and high beams before reassembling everything.
One critical detail many guides omit: the H4 bulb must be inserted with the correct orientation. The three tabs are not symmetrical—the bulb only fits one way. If you force it, you will damage either the bulb or the socket.
Why Beam Pattern Matters More Than Brightness
The reflector in an H4 headlight housing has two distinct segments. The upper half creates the low beam with a sharp cutoff line that prevents glare for oncoming traffic. The bottom segments create the high beam. This design assumes the light source—the halogen filament—is positioned at a specific point in space.
When you install an LED bulb that places its emitters even slightly off that position, the beam pattern breaks. Light scatters into areas it should not go. You get bright spots directly in front of the bumper but darkness further down the road. Oncoming drivers see glare instead of a clean cutoff.
Quality H4 LED bulbs address this with what manufacturers call “1:1 design”—emitter placement that mirrors the exact position of the halogen filament. Some use ultra-thin chip spacing as narrow as 0.0074 inches to achieve a super-focused beam pattern with 360-degree stable lighting and no dark spots. Others feature adjustable adapters that allow fine-tuning of the beam angle.
This is not a minor detail. A bulb with poor beam pattern is not just ineffective—it is dangerous. You cannot see as far as you need to, and you are actively blinding other drivers.
Thermal Management: The Overlooked Failure Point
LEDs generate heat. Unlike halogens, which are designed to run hot, LEDs become less efficient at high temperatures and can suffer permanent damage above 150°C. Thermal management is therefore the single most important factor in LED longevity.
Manufacturers use two main approaches to cooling:
- Active cooling (fans) – Small fans pull heat away from the LEDs. These fans typically run at 8,500 to 20,000 RPM. They are effective but introduce noise, collect dust over time, and can fail—taking the bulb with them.
- Passive cooling (heatsinks) – Aluminum or copper heatsinks dissipate heat through convection. No moving parts means no mechanical failure. Some designs use finned aluminum heatsinks that can be bent and rotated for better fit in tight spaces.
Aviation-grade aluminum is increasingly common in premium H4 LED bulbs because it provides both structural strength and superior heat dissipation. Copper-backed PCBs further improve thermal transfer from the LED chips to the heatsink.
The fanless approach has a significant advantage beyond reliability: it eliminates the outgassing problem that plagues many fan-cooled designs. When plastic components in fan-cooled bulbs heat up, they release gases that can fog the inside of your headlight housing—a damage that cannot be cleaned without destroying the reflector coating.
CANbus Compatibility and Flickering
One of the most common complaints about H4 LED upgrades is flickering. The cause is straightforward: LEDs draw significantly less power than halogens, and many vehicle electrical systems interpret this lower draw as a bulb failure. The system pulses power to “check” if the bulb is working, creating the flickering effect.
The solution is a CANbus decoder or anti-flicker harness. These devices add resistance to the circuit, fooling the vehicle’s computer into thinking a halogen bulb is still installed. They typically plug in between the factory wiring harness and the LED bulb, requiring no permanent modification.
Most quality H4 LED bulbs either integrate CANbus decoders internally or work with plug-and-play adapters. If a bulb does not mention CANbus compatibility, assume it will flicker in your vehicle. Some German vehicles—BMW, Audi, Volkswagen, Mercedes-Benz—are particularly sensitive and may require additional resistors.
What Experienced Drivers Actually Say
Forum discussions reveal patterns that marketing materials never mention. On the MGB & GT Forum, one enthusiast who tested multiple H4 LED options shared: “The GTR Mini’s I was previously using worked just fine, cost less, and the high beam flash worked all the time.” He later compared them to a premium competitor and concluded: “I can’t say that the 4.0 light output or beam pattern is noticeably better than the GTR Lighting units.”
On the Norton Owners Club forum, a member who tested a cheap LED bulb noted that while it consumed just 4 watts, “the beam pattern was non-existent—a complete spread of light in all directions.”
These real-world experiences highlight a consistent theme: precision engineering matters more than advertised specifications. A bulb that fits correctly and places its emitters precisely will outperform a higher-lumen bulb with poor beam control.
Frequently Asked Questions About H4 Headlight Bulbs
What vehicles use H4 headlight bulbs?
H4 bulbs are commonly found in Toyota, Honda, Jeep, Suzuki, Subaru models, and many motorcycles including Yamaha and Royal Enfield. Always verify your specific year and model in your owner’s manual before purchasing.
Are H4 and 9003 the same bulb?
Yes, H4, 9003, and HB2 are the same bulb specification. They all use the P43t base and dual-filament design. The different names reflect regional naming conventions rather than technical differences.
Can I put LED bulbs in H4 headlights?
Yes, but only if the LED bulb is designed to replicate the exact filament position of the halogen. Bulbs with 1:1 emitter placement preserve the beam pattern. Cheap LEDs with incorrect placement will scatter light and blind other drivers.
Why do my H4 LED bulbs flicker?
Flickering occurs because LEDs draw less power than halogens, and your vehicle’s electrical system interprets this as a bulb failure. A CANbus decoder or anti-flicker harness solves this by adding resistance to the circuit.
How long do H4 LED bulbs last?
Quality H4 LED bulbs typically last 30,000 to 50,000 hours—roughly 30 to 50 times longer than halogen bulbs. However, poor thermal management can reduce this significantly. Fanless designs with aluminum heatsinks tend to have the longest service life.
Are H4 LED bulbs legal?
Legality varies by jurisdiction. In some regions, retrofitting LED bulbs into halogen housings is not permitted unless the bulb carries specific approvals. Always check local regulations and look for bulbs with ECE certification or equivalent approvals.
Making the Right Choice for Your Vehicle
Understanding the H4 headlight bulb specification is the first step toward making an informed upgrade decision. You now know what the P43t base means and why the three-prong design matters. You understand why beam pattern is more important than raw lumen output. You know the difference between active and passive cooling, and why CANbus compatibility prevents flickering.
GTR Lighting builds H4 LED bulbs that address each of these engineering challenges. The CSP Mini Series features fanless passive cooling with precision emitter placement that mirrors factory halogen filament positions. The Ultra 3.0 Series delivers industry-leading output while maintaining the beam patterns that keep you safe and keep other drivers from flashing their high beams at you.
Every GTR bulb is engineered with aviation-grade materials, copper substrates for optimal thermal transfer, and built-in CANbus compatibility that works with most vehicles out of the box. Backed by a lifetime warranty, these are bulbs designed to outlast the vehicles they go into.
Stop guessing. Start driving with confidence. Visit GTR Lighting today and discover what proper H4 headlight engineering actually looks like.
Disclaimer: Always verify your vehicle’s bulb size in your owner’s manual before purchasing. Installation should be performed by a qualified technician if you are unsure about the process. Headlight aim should be checked after any bulb replacement to ensure compliance with local regulations.