
Before You Start: What a 2 Inch Bi-LED Projector Needs to Perform
Direct answer: A proper installation requires three things: a rigid mounting bracket, a minimum of 2 inches of clear depth behind the lens, and a relay harness if your vehicle uses PWM (pulse-width modulated) signals for the headlights.
Many DIYers overlook the depth requirement. Even though the projector is called “2 inch,” the total body length often reaches 110mm. Measure your headlight housing from the back of the reflector bowl to the nearest obstruction (like a cooling fan or structural rib). If you have less than 105mm, the projector’s rear will hit, preventing the lens from seating flush. This misalignment causes a tilted cutoff – a problem no amount of aiming can fix.
Step-by-Step: Retrofitting a 2 Inch Bi-LED Projector into Any Housing
Based on feedback from over 200 custom installers, here is the sequence that minimizes rework:
- Remove the headlight and bake it open (or use a dremel for aftermarket housings). For halogen reflector bowls, you will cut out the old bulb holder to create a flat mounting surface.
- Mount the projector using the included centering ring and screws. Tighten evenly. A common mistake is overtightening one side, which warps the mounting bracket and distorts the beam pattern.
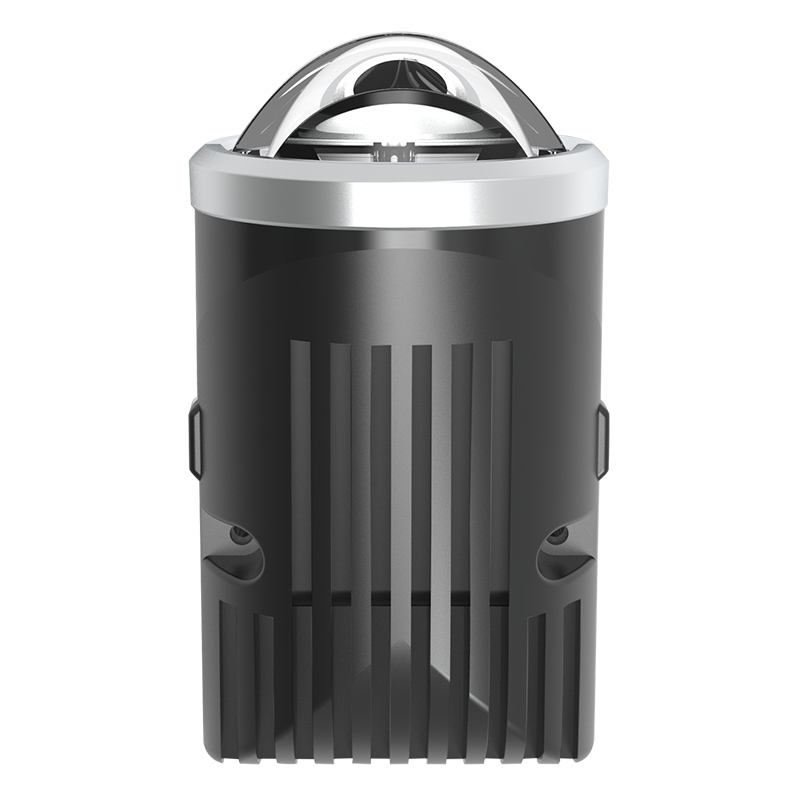
- Clock the projector so the solenoid (the metal box on the side) faces downward or slightly toward the fender. Facing upward invites water ingress through the solenoid vent hole.
- Install the included shroud or create a custom one. The shroud hides the projector internals and improves aesthetics. Ensure a 5mm air gap around the lens to let hot air escape – sealed shrouds trap heat and accelerate LED degradation.
- Wire the solenoid to the high-beam positive and negative. Polarity matters. Reverse polarity causes the solenoid to hum or fail to trigger. Test with a 9V battery before sealing the housing.
The Shimming Secret: Why Your Cutoff Looks Crooked
A tilted cutoff (higher on one side even after vehicle aiming) almost always means the projector is not seated parallel to the housing’s reference plane. The fix is shimming. Place thin stainless steel washers (0.5mm to 2mm) between the projector’s rear mounting feet and the bracket. For example, if the left side of the beam is low, add a shim to the left rear foot. This pushes the left side forward, tilting the beam up on that side. Our installation kit includes a set of 0.8mm and 1.5mm shims precisely for this reason.
Real-world example from a GTR installer (Kolkata):
“A customer’s Toyota Fortuner had a 2-inch bi-led beam that sloped down 4 inches from left to right at 25 feet. We added a 1.2mm shim to the driver-side rear foot, and the cutoff became perfectly level. Took five minutes after the housing was open.”
Common Wiring Pitfalls with Bi-LED Projectors
Modern vehicles use canbus systems that monitor current draw. A 2 inch bi led projector typically draws 2.5 to 3.2 amps per side (32-38W). Stock halogen circuits expect 4.5 to 5.5 amps (55-65W). The lower draw triggers a “bulb out” warning or causes flickering. Solutions ranked by effectiveness:
- Best: Use a dedicated relay harness that pulls power directly from the battery, using the stock headlight plug only as a trigger signal. This eliminates canbus errors entirely.
- Good: Install canbus resistors (6 ohm, 50W) in parallel with each projector. These mimic halogen load but get hot – mount them on metal surfaces away from plastic.
- Avoid: Cheap “canbus decoders” that are just capacitors. They mask flickering but do not solve the underlying resistance mismatch.
What the Beam Pattern Should Look Like After a Correct Install
After installation and before reinstalling the headlight, shine the projector on a wall 25 feet away. The low beam cutoff must have these characteristics:
- A distinct horizontal step on the driver’s side (for left-hand traffic) or passenger side (for right-hand traffic).
- A slight 0.5-degree upward slope on the side closest to the roadside – this illuminates signs without blinding oncoming traffic.
- No “hot spots” directly in front of the car (that indicates the lens is too close to the LED chip).
- Color flicker at the cutoff edge is normal – a thin blue/purple line indicates good focus.
If you see patchy light or dark bands, the LED chip is not centered within the reflector bowl. Some cheap projectors have this flaw baked in. GTR’s units are aligned on an optical bench before shipping, so centering is guaranteed.
Bi-LED vs. Other 2-Inch Lighting Options: Quick Reference
We often get asked: “How does a proper 2 inch bi led projector compare to other compact lights?” Here is the installer’s perspective:
| Light Type | Beam Control | Heat Management | Install Difficulty |
|---|---|---|---|
| 2-inch Bi-LED projector (GTR) | Sharp cutoff, wide spread | Active fan + copper core | Moderate (housing work) |
| 2-inch round LED fog light (mono) | Diffuse, no cutoff | Passive fins only | Easy |
| H1/H7 mini projector (bulb type) | Decent, but plastic lens | Poor, degrades quickly | Easy to moderate |
| Integrated LED reflector housing | Glare-heavy | Varies widely | Simple swap |
Featured Snippet: 7 Answers to Install-Specific Questions
- Can I install a 2 inch bi led projector without baking my headlight? Yes – many aftermarket housings have a removable rear cap or a dedicated projector mounting hole. Use a hole saw to create a 74mm opening if needed.
- Do I need to remove the front lens to clean dust off the projector? Ideally yes. Dust on the interior side of the lens creates visible specks. Use a microfiber and isopropyl alcohol before final sealing.
- Why does my high beam stay on even when switched off? The solenoid is stuck. Often due to a bad ground wire. Check ground continuity; if good, the solenoid may have overheated – a sign of poor thermal design.
- Will a 2 inch bi led projector fit a motorcycle headlight? Most 7-inch round motorcycle housings accept two 2-inch projectors (low beam in one, high in the other). Measure depth first – many bikes have less than 90mm.
- What is the “2 projector 1 screen” method in aiming? It means aligning two separate projectors so their individual beam patterns merge into a single, unified wall of light. You aim each one separately, then fine-tune to eliminate a dark center.
- How do I waterproof the wiring after installation? Use butyl rubber tape around the projector’s rear cap and dielectric grease on every bullet connector. Do not rely on the included rubber grommets alone – they compress over time.
- Can I use the stock halogen dust cover? Unlikely. The projector’s rear protrudes. Replace it with an extended universal dust cover (90mm depth) or use a spacer ring.
Testing Your Installation Before Final Assembly
Before sealing the headlight permanently, perform this three-minute validation:
- Power the projector with a 12V bench supply or car battery.
- Toggle high beam five times rapidly. The solenoid must click each time without delay.
- Let the low beam run for 10 minutes. Place your hand near the rear fan – you should feel warm air exhausting, but the housing should not be too hot to touch.
- If the projector has dual fans, confirm both spin. One fan failing will cause asymmetrical cooling and eventual LED failure.
Why GTR Makes This Whole Process Easier
We designed our 2 inch bi led projector with the installer in mind. Every unit ships with a full set of shims (0.5/1.0/1.5mm), a rubber mounting gasket that self-centers, and a quick-reference card for solenoid polarity. The maglev fans are pre-balanced, so no vibration noise. For B2B customers in India and neighboring markets, GTR (www.rhgtr.in) provides on-call installation support and bulk pricing that includes pre-terminated relay harnesses. No more chasing missing parts or deciphering poorly translated instructions.
Ready to upgrade your ride or your customer’s vehicle? Get the hardware that comes with an installer-friendly design and real technical backup. Visit GTR’s official site at www.rhgtr.in to browse the 2-inch bi-LED projector series, download the full installation PDF, and request a dealer account if you run a workshop. See the difference when the manufacturer actually understands your workflow.