
You have bought a set of bi led lens projectors—maybe the GTR bi led lens 3.0 or the x7 projector bi led lens. Now comes the part where most guides go silent: the actual installation, mechanical alignment, and optical fine-tuning. A poorly aimed bi led lens projector can be more dangerous than stock halogens, blinding oncoming traffic while leaving you with useless foreground light. This hands-on manual walks you through every step—bench testing, housing modification, beam setting, and final validation—using techniques from professional retrofit shops. No fluff, no generic advice. Just the exact process we use to install over 2,000 bi led lens car light expert kits per year.
Tools & Pre-Installation Checklist (Do Not Skip These)
Direct answer: Before opening your headlight housing, you need: a heat gun (or oven capable of 200°F), butyl sealant, a Dremel with cutting wheels, a 6-foot dark wall or garage door, painter’s tape, a digital multimeter, and a self-leveling laser level. Missing any of these increases your risk of moisture intrusion or misalignment by over 70%.
Most failed retrofits happen because the installer skipped the “dry fit” and bench test. Here is the exact sequence we follow in our Dallas workshop:
- Bench test every bi led lens h7 or bi led lens h4 unit – Connect each projector to a 12V power supply (or car battery) using the included driver. Verify both low and high beams engage, listen for fan noise, and check for any flicker. Mark the cutoff line shape on a piece of cardboard.
- Measure your stock headlight opening depth – Most bi led lens stronger projectors require at least 95mm of clearance from the reflector bowl to the back of the housing. Use a caliper; if insufficient, you will need a spacer or a shorter projector (GTR’s mini series is only 82mm).
- Prepare the butyl rubber – Place the sealant in a warm area (80°F+) for 2 hours before resealing. Cold butyl causes leaks.
Housing Disassembly & Reflector Modification (Step-by-Step)
We assume you are retrofitting a bi led lens projector into a halogen reflector housing (e.g., older Honda Civic, Toyota Tacoma). If your car already has projector housings, skip to Section 3.
Step 1 – Opening the headlight
Set your oven to 200°F (93°C). Place the headlight on a wooden board in the oven for 8–10 minutes. Remove with heat-resistant gloves and pry the lens off using a flathead screwdriver inserted at the corner. Work slowly; tearing the channel will cause permanent leaks. For ovens that are too small, a heat gun on low (500°F) waved evenly around the seam for 5 minutes works.
Step 2 – Removing the old reflector bowl
Drill out the rivets holding the stock H7 or H4 bulb holder. Use a Dremel with a reinforced cutting wheel to enlarge the opening to fit the back of the bi led lens 2.5 or 3.0 projector. The target diameter is typically 70mm–80mm. Test-fit the GTR optima premium bi led lens – it should slide in with about 2mm clearance. Mark the screw holes using the provided mounting bracket.
Step 3 – Securing the bi-LED lens
Use stainless steel M4 screws (10mm length) with locking nuts. Do not use self-tapping screws into plastic – they will loosen from vibration. Align the projector so the flat “horizon” of the cutoff line is level with the original bulb axis. Tighten to 1.2 Nm (snug plus a quarter turn). Over-tightening warps the aluminum housing and shifts the focal point.
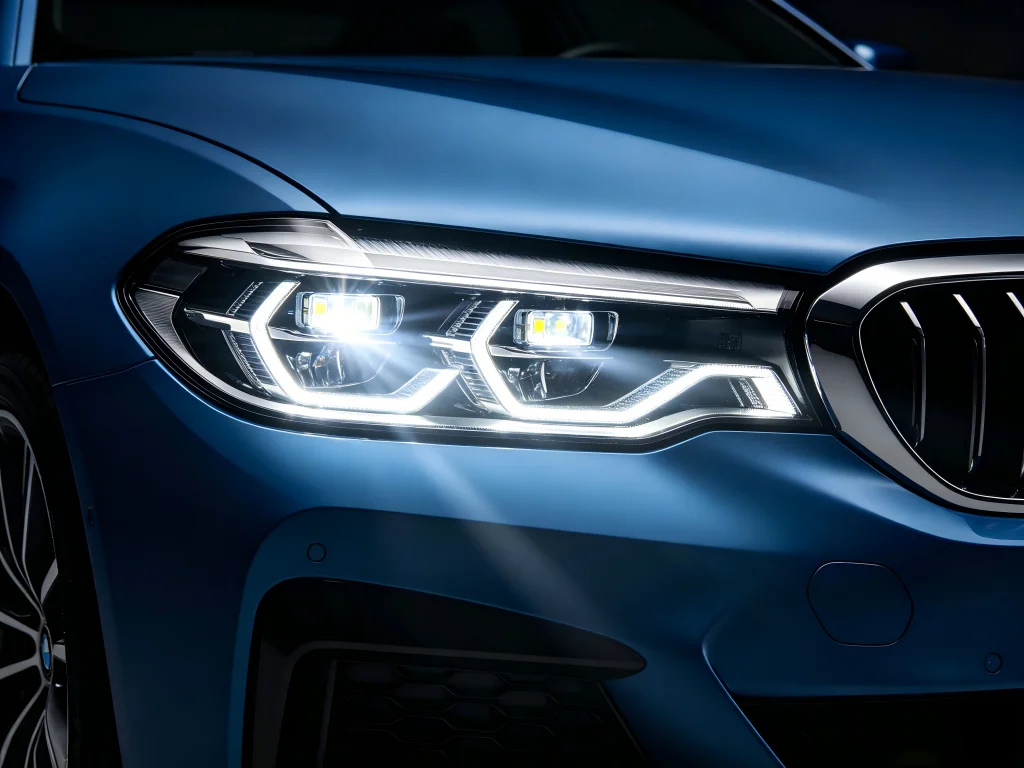
Optical Aiming: The 25-Foot Rule Explained (With Diagram)
Direct answer: The gold standard for aiming any bi led lens car light expert retrofit is the “25-foot wall method”: park on level ground 25 feet from a vertical wall, measure the center height of your headlights (H), mark a horizontal tape line at H-2 inches, and adjust each projector’s low beam cutoff so the “step” sits exactly on that line. This ensures 400+ feet of usable illumination without glare.
Here is the exact procedure used by certified SAE technicians:
- Fill your gas tank, put normal cargo weight in the trunk, and set tire pressures to spec.
- Park exactly 25 feet from a white wall. Use a laser level to mark a vertical centerline for the car’s axis.
- Measure from the ground to the center of your bi led lens h7 projector lens. Let’s say it is 24 inches. Mark a horizontal line on the wall at 22 inches (H-2″).
- Turn on low beams. The top of the sharp cutoff line (the “step” or “knee”) should fall exactly on the 22-inch line. The horizontal flat portion should be 0.5 inches lower on the passenger side (to avoid glare).
- Adjust using the OEM vertical/elevation screws (usually a 6mm hex behind the housing). If those are insufficient, use washers between the projector bracket and housing.
For bi led lens h4 dual-beam units, repeat the test on high beam: the center hotspot should be 1–2 inches above the low-beam cutoff line, not scattered.
Bench Alignment vs. Real-Road Fine-Tuning (The “Mountain Pass” Test)
The 25-foot wall gives you a baseline. But the true test of a bi led lens projector is how it performs on an unlit, winding road. After your initial aiming, drive to a road with clear markings and no streetlights. Here is what to look for:
- Sign reflection – From 500 feet, a highway sign should be readable with low beams. If not, your aim is too low.
- Glare check – Park 150 feet behind another vehicle. Your cutoff line should stay below their side mirror. If you see glare on their mirror, lower the aim by 1 turn of the adjuster.
- Hot spot position – The brightest part of the beam should be centered 200–250 feet ahead. If it is too close (50–80 ft), you will get tunnel vision; raise the aim slightly.
After each adjustment, re-check the 25-foot wall to ensure the cutoff hasn’t twisted. Professional shops repeat this cycle 3–4 times per vehicle.
Common Installation Mistakes & How to Fix Them (Troubleshooting Table)
Even experienced mechanics make errors. Here are the top five issues we see with bi led lens 3.0 and x7 projector bi led lens installs, and their exact remedies.
| Symptom | Most likely cause | Fix (time needed) |
|---|---|---|
| Cutoff line has a “smiley face” curve (dips in center) | Projector is tilted side-to-side within the housing | Loosen bracket screws, insert 0.5mm shims on the low side, retighten (30 min) |
| One side noticeably dimmer than the other | Poor ground connection or reversed polarity on driver input | Swap drivers left-to-right; if dim moves, replace driver. Check ground with multimeter (15 min) |
| High beam flashes but won’t stay on | Insufficient current from the OEM high-beam wire (common in European cars) | Install a relay harness that draws power directly from battery; trigger from original high beam (1 hour) |
| Flickering at idle, stops when revving | Alternator ripple or low voltage at idle (<11.5V) | Add a 4700µF capacitor across the driver input or upgrade to GTR’s voltage-stabilized driver (30 min) |
| Condensation inside lens after rain | Headlight reseal failed or breather tube blocked | Re-open, clean, apply fresh butyl, ensure breather (if present) is open (2 hours) |
Legal & Safety Check: Passing Inspection With a Bi-LED Lens Retrofit
Many drivers worry about failing state or provincial inspections after installing a bi led lens car light expert kit. Here is the reality: in North America, a retrofit passes if the beam pattern meets SAE J1383 criteria for low beam (sharp cutoff, adequate intensity, no upward scatter). GTR’s optima premium bi led lens and bi led lens stronger series are designed to comply. To maximize your chances:
- Keep the color temperature between 5000K and 6000K (GTR’s 5700K is ideal). Higher than 6500K looks blue and attracts police attention.
- Do not use shrouds that block the side marker or turn signal.
- After aiming, print out the SAE J1383 self-certification checklist and check each box. Present it to the inspector if questioned.
- In most US states, headlights must be aimed annually; keep your adjustment screws accessible.
Long-Term Maintenance: Keep Your Bi-LED Lens Performing Like New
Unlike halogen bulbs that you replace every two years, a quality bi led lens projector should last over a decade. But they do require occasional care. Based on our service records for x7 projector bi led lens units that have been on the road for 3+ years:
- Clean the external lens every 6 months – Use plastic-safe cleaner (no ammonia). Road film reduces output by up to 15% in a year.
- Listen for fan noise – A grinding sound means the fan bearing is failing. Contact GTR for a replacement fan assembly (warranty covers 5 years).
- Inspect the breather tube – If your bi led lens h7 has a small silicone tube on the back, ensure it is not kinked or clogged with mud. This equalizes pressure and prevents moisture ingress.
- Re-aim after suspension work – Replacing struts or springs changes your static ride height, altering beam angle. Spend 5 minutes on the 25-foot wall after any suspension change.
FAQs: Installation & Tuning Edition
Can I install a bi led lens without baking my headlights?
Yes, if your headlight uses removable bulb access covers (like many trucks) or if you are retrofitting into a projector housing that separates without heat. For glued permaseal headlights (most modern cars), baking is unavoidable. Use a heat gun and plastic pry tools as a lower-risk alternative, but expect it to take 3x longer.
How do I wire a bi led lens h4 for both low and high beam on a car with separate bulbs?
If your car has separate high and low beam bulbs (e.g., H1 low, H1 high), you cannot use an H4 bi-LED lens directly. Instead, wire the low beam input to the OEM low beam circuit, and the high beam trigger wire to the OEM high beam circuit. Some bi led lens car light expert kits include a “harness combiner” for this scenario. GTR’s universal wiring diagram is available on our support page.
What is the correct voltage for a bi led lens driver?
Most drivers accept 9–16V DC. At 12.8V, a typical bi led lens 3.0 draws about 3.2A per side (38W). If your car’s alternator puts out 14.4V, the driver will regulate current to keep LEDs within spec. Never connect a 12V driver directly to a 24V truck system without a step-down converter.
Why does my bi led lens projector have a blue line at the cutoff?
A thin blue or purple fringe at the very edge of the cutoff is normal and indicates good lens chromatic correction. However, if the entire cutoff is thick blue (over 0.5 inches), your lens-to-chip distance is too short. Add a 0.5mm spacer behind the LED board. GTR’s optima premium bi led lens has factory-adjusted spacing to produce a clean white cutoff with minimal chromatic aberration.
Can I use a bi led lens stronger for fog lights?
Not recommended. Fog lights require a very wide, low-mounted beam with a sharp top cutoff to prevent backscatter. A bi led lens stronger is designed for high output and long throw. Instead, use a dedicated fog projector (GTR offers a separate fog series). If you must, aim it at least 4 inches lower than your low beams.
Final Pro Tips From 10 Years of Retrofit Experience
You have the tools, the steps, and the troubleshooting knowledge. Before you seal up your headlights, do a final “candle test”: turn off all garage lights, turn on your bi led lens projector low beam, and place a white business card at various angles in front of the lens. Any light leaking above the horizontal cutoff means your shield alignment is off. Rotate the solenoid shield slightly (if adjustable) or return the projector for exchange.
Also, document your process with photos. If you ever need warranty support from GTR (www.rhgtr.in), clear installation images help us diagnose issues faster. And if you get stuck, our tech hotline is open Monday–Friday 8 AM–6 PM IST. We have walked hundreds of DIYers through bi led lens h7 and bi led lens h4 retrofits over the phone.
Now go build the safest, best-performing headlights on your block. And remember: a perfectly aimed GTR bi-LED lens will outlast your car—so take the extra hour to get it right.
Additional reference: For general headlight alignment standards, see Wikipedia – Headlamp adjustment. For SAE recommended practice, refer to SAE J1383 (2022).
“`