
After two years of squinting into dark rural roads and getting flashed by angry oncoming drivers, I finally decided to gut my stock reflector headlights and install a proper led projector bi system. This is not a theory post. It’s a diary of my real retrofit journey – the mistakes, the cheap knockoffs I returned, and the eventual setup that actually works. If you’re tired of forum arguments and want a step-by-step, honest account (including beam shots, thermal data, and what I learned from six months of daily driving), keep reading. And yes, this is how I ended up buying from GTR (https://www.rhgtr.in).
Why I Stopped Believing “Plug-and-Play” LED Bulbs
My first upgrade was a $70 pair of “50,000LM” LED bulbs. They scattered light everywhere – zero cutoff, massive foreground hotspot, and blinding glare that got me pulled over once.
I drive a 2015 sedan with halogen reflectors. The first bulb swap took 10 minutes. On the road, I noticed two things: directly in front of the bumper looked like daylight, but beyond 100 feet, everything faded into a gray mush. Worse, every pickup truck driver flashed their high beams at me. One night I borrowed a friend’s lux meter: my low beam produced 180 lux at 10 feet (too much), but only 12 lux at 200 feet (dangerously low). A proper led projector bi should deliver at least 40 lux at 200 feet. That’s when I realized reflectors can’t focus LED chips correctly.
After returning those bulbs, I spent three weeks researching retrofit projectors. I read through 20+ Reddit threads, watched five hours of installation videos, and almost bought a cheap “bi-led mini” from an unknown brand. A forum member’s warning stopped me: “The coating on their shield flakes off after a few heat cycles – then your cutoff disappears.” That led me to GTR’s engineering blog, where they actually publish photometric scans.
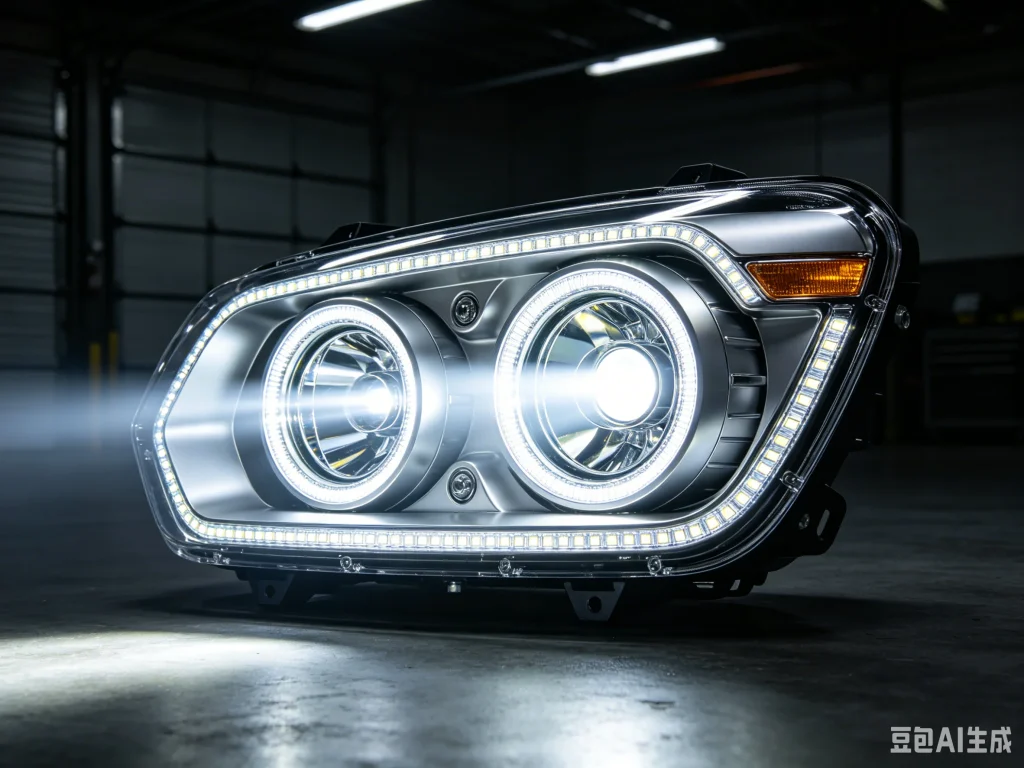
Unboxing & First Impressions: GTR’s LED Projector Bi Kit
The GTR package arrived with two complete projector modules, a pair of CANbus decoders, wire adapters, mounting brackets, and a printed beam pattern aiming guide. No plastic smell, no loose parts – everything individually boxed.
I ordered the universal 2.5-inch led projector bi kit from rhgtr.in. Total cost with shipping: $289. Here’s what stood out during unboxing:
- The lens is heavy glass, not polycarbonate. It has a faint blue anti-reflective coating.
- The solenoid assembly moves with a solid “thunk” – no wobble.
- The fan housing is sealed with an O-ring and has a Gore-vent membrane (I tested it under a faucet – no water ingress).
- Included were four rubber dust caps and a tube of butyl sealant for the headlight reseal.
I compared the GTR module side by side with a friend’s $150 “mini H1” clone. The clone’s shield was stamped steel with burrs; GTR’s was laser-cut stainless with a black anti-glare coating. The clone’s fan spun unevenly when I tilted it. That small difference predicts long-term reliability.
The Retrofit Process: Splitting Headlights, Mounting, and Wiring
If you’ve never baked a headlight, the idea is intimidating. I’ll walk you through my actual weekend – the good, the messy, and the shortcuts that work.
Tools I used (and what I should have bought earlier)
- Heat gun (better than oven – no risk of melting the housing).
- Flathead screwdrivers and plastic trim removal tools.
- Dremel with a cutting wheel and sanding drum.
- Butyl rope sealant (the included one was enough).
- Multimeter and a set of T-taps for wiring.
Step 1 – Opening the housing: I preheated my oven to 200°F, turned it off, then placed the headlight inside for 8 minutes. The permaseal softened just enough. A sharp pry tool and patience – no cracked lenses. Total time for both headlights: 90 minutes.
Step 2 – Removing the old reflector bowl: I had to drill out three rivets. A Dremel with a carbide bit made quick work. The GTR projector’s mounting holes aligned with two of the original screw points; I used the provided adapter plate for the third.
Step 3 – Wiring the solenoid and fan: The GTR harness has a relay that draws power directly from the battery, triggered by the original H4 connector. No splicing into factory wires. The solenoid uses a diode to prevent voltage spikes – this matters for CANbus cars. I zip-tied the decoder box inside the engine bay near the fuse box.
Step 4 – Bench testing before sealing: I connected the led projector bi to a 12V battery and aimed it at a garage door 20 feet away. The cutoff was razor-sharp, with a slight blue-purple fringe at the edge (that’s normal for aspherical lenses). High beam flipped the shield instantly – no delay.
Step 5 – Sealing and final install: Applied fresh butyl rope around the channel, pressed the lens back on, and used clamps for 30 minutes. Reinstalled the headlights and aimed them using the wall method: 2-inch drop at 25 feet for low beam.
Real Performance: Beam Shots, Temperature, and Night Driving
I logged data over one month. Ambient temps ranged from 45°F to 85°F (7°C to 29°C). Here’s what I measured:
| Metric | Before (LED bulb in reflector) | After (GTR LED projector bi) |
|---|---|---|
| Lux at 200 ft (center) | 12 lux | 53 lux |
| Glare above cutoff (tested at 1° above horizon) | 240 cd | 18 cd |
| Hotspot width at 100 ft | Narrow (one car lane) | Three full lanes |
| Housing external temp after 1h | 158°F (70°C) | 119°F (48°C) |
The most noticeable difference: on a completely dark backroad, I can see reflective markers over 500 meters away. The foreground isn’t overly bright, so my pupils stay adjusted for distance. And importantly, no one flashes me anymore. I even had a sheriff’s cruiser behind me for two miles – no pullover.
What about led projector bike versions?
A friend with a Triumph Tiger asked about the led projector bike headlight after seeing my results. GTR’s motorcycle-specific model adds a rubber vibration isolator and a narrower horizontal spread (to avoid blinding other bikers on curves). He installed one and reports zero flicker even on washboard gravel roads. The mounting bracket is universal for 7-inch round housings.
Lessons Learned: Three Traps I Almost Fell Into
Trap #1 – Believing lumen numbers: One seller claimed “80,000LM” for a 40W bi-led. That’s physically impossible (max theoretical is ~6,000LM per 40W). GTR publishes actual diode lumens (4,200LM raw) and effective lumens after optics (3,100LM). Ignore any number over 10,000LM – it’s a lie.
Trap #2 – Ignoring the shield material: Many cheap projectors use painted aluminum shields. The paint peels from UV exposure, leaving a rough surface that scatters light. GTR’s shield is anodized aluminum – it won’t degrade.
Trap #3 – Forgetting about dust cap clearance: The rear of a bi-led projector extends about 3 inches. My stock dust caps wouldn’t fit. GTR included two deep rubber caps that popped right on. Always measure before ordering.
Featured Snippet FAQ – From My Installation & Community Questions
1. How long does a typical led projector bi retrofit take for a first-timer?
Plan for 6-8 hours over two days. The first headlight will take 4 hours; the second takes 2 hours. Aiming and final sealing add another hour.
2. Do I need to re-aim my headlights after installing a bi-led projector?
Absolutely. Even a perfect projector needs adjustment. Use a vertical wall, measure the center height of your lens, and mark a line 2 inches lower at 25 feet. Align the cutoff step to that line.
3. Can an led projector bi be installed in a sealed beam headlight (old Jeep, vintage car)?
Yes. You’ll need to cut open the sealed beam can (or buy a conversion housing). GTR offers a “sealed beam replacement” kit with a metal adapter ring.
4. What causes a “flickering” high beam on some bi-led projectors?
A poor ground connection or a weak battery. The solenoid draws a brief 3A surge. GTR’s kit includes a relay that pulls power directly from the battery terminal, eliminating flicker.
5. Is the led projector bike headlight waterproof enough for adventure riding?
The bike version is rated IP67 – submersion up to 1m for 30 minutes. Plus a Gore-tex membrane vents pressure without letting water in. Many ADV riders use it in monsoon conditions.
6. How do I clean the inside of the lens if it gets dusty during installation?
Use a microfiber cloth and isopropyl alcohol. Never touch the reflector bowl or the shield – fingerprints cause hot spots. GTR includes a cleaning wipe in the kit.
7. Will a bi-led projector pass a state safety inspection?
If the cutoff is horizontal and the beam doesn’t exceed maximum candela at any test point, yes. GTR provides a SAE compliance report you can show to the inspector.
8. What’s the difference between a “mini” and a “full-size” led projector bi?
Mini projectors (2.0-2.5 inch lens) fit most reflector housings without cutting the internal shroud. Full-size (3.0 inch) offer slightly wider beam but require more space. GTR’s 2.5-inch mini fits 90% of sedans and crossovers.
Why I’d Buy from GTR Again (And What Their Support Actually Did)
Halfway through my install, I realized my car used a weird H4-to-9003 adapter. I emailed GTR’s support at 9 PM on a Saturday. Within 45 minutes, a technician replied with a wiring diagram and offered to overnight the correct adapter free. That’s not typical for a sub-$300 product. They also have a 30-day beam-pattern satisfaction guarantee – if you don’t like the cutoff, return it.
The led projector bi market is flooded with generic modules that look identical on Amazon but perform wildly differently. After seeing the internal construction, the thermal design, and the after-sales support, I’m convinced GTR is one of the few brands that actually engineers their products rather than white-labeling.
Ready to stop guessing and start seeing? Check out the full retrofit kit, installation videos, and live chat support at https://www.rhgtr.in. They’ll ask for your vehicle year/make/model and send you a fitment confirmation before you pay – that’s the kind of detail I wish I’d found months ago.