
Retrofitting a genuine bi led headlight projector lens into your factory headlight housing takes 3–5 hours per side and requires basic hand tools, a heat gun or oven, and patience—but the night-driving transformation is worth every minute.
You have read the reviews. You understand the optical superiority of a bi led projector lens retrofit kit over any plug-and-play LED bulb. Now you are ready to do the work yourself. Good.
In our GTR workshop, we have retrofitted over 200 vehicles—from Honda Civics to Ford F-150s. This guide compiles every lesson we learned the hard way so you do not have to.
What You Need Before Starting Your Retrofit
A complete 2.5-inch bi led headlight projector lens retrofit requires these tool categories: headlight opening tools, mounting hardware, wiring accessories, and aiming equipment.
Below is the exact checklist we use in our shop. Print it. Check each box before removing your first headlight.
| Category | Specific Item | Why You Need It |
|---|---|---|
| Opening the housing | Heat gun (variable temp) or oven, flathead screwdrivers (2x), trim removal tools, oven mitts | Softens OEM sealant without melting plastic |
| Removing old components | Phillips #2, 8mm/10mm sockets, Dremel with cutting wheel (if shaving needed) | Extract factory reflector bowl or old projector |
| Mounting the Bi-LED projector | Threaded shaft locking nut (included with GTR kit), washer set, 2-part epoxy (JB Weld) for backup | Secures projector at correct depth and angle |
| Wiring | Wire strippers, crimping tool, heat shrink tubing, butt connectors, zip ties, relay harness (if needed) | Safe, waterproof electrical connections |
| Resealing | Butyl rubber sealant (Morimoto RetroRubber or equivalent), clamps, gloves | Prevents moisture and fogging |
| Aiming | Masking tape, tape measure, level, wall with 25+ feet of flat ground | Legal and safe beam alignment |
“In our experience, first-time retrofitters underestimate the time needed for housing resealing. Budget an extra hour for cleaning old sealant and applying fresh butyl rubber—moisture inside the lens kills projector performance and ruins your work.”
Step 1: Remove and Open Your Headlight Housing Safely
Every vehicle differs slightly, but the core process remains consistent.
- Disconnect the battery negative terminal. Always.
- Remove the headlight assembly from your vehicle. Usually 2–4 bolts and unclipping wiring harnesses. Consult your vehicle service manual for exact locations.
- Clean the exterior thoroughly. Any dirt falling inside during opening will be trapped forever.
- Heat the housing perimeter using a heat gun on medium setting (350–400°F) or oven at 200–225°F for 8–10 minutes. Move constantly to avoid melting.
- Pry the lens away starting from a corner. Use plastic trim tools to avoid cracking the lens. Work slowly around the entire seam.
Pro tip from our workshop: Bake headlights during colder months when sealant is stiffer. In summer, even 10 minutes in a hot car can soften the adhesive enough to make opening messy. Keep the work area clean—dust that lands on the inside of your lens shows up as permanent spots under the beam pattern.
Step 2: Remove Factory Reflector or Old Projector
You will find either a halogen reflector bowl or a worn-out single-beam projector inside.
- For reflector housings: The reflector bowl is usually held by 3–4 adjustment screws. Remove the screws completely. Some bowls also have plastic tabs you must release. Keep the adjustment brackets—you may reuse them.
- For existing projectors: Remove the mounting screws or brackets. If the projector is epoxied in (common in some OEM designs), carefully cut the epoxy with a Dremel wheel. Do not damage the housing mounting points.
Clean the interior thoroughly with compressed air and a lint-free cloth. Any debris left inside will float onto the lens over time and create dark spots in your bi led projector lens output.
Step 3: Mount Your New Bi-LED Projector
For a threaded-shaft design (like GTR’s 2.5-inch kit), slide the projector through the bulb opening from inside the housing, then thread the locking nut onto the shaft from the outside. Hand-tighten first, then use pliers for a final quarter-turn. Do not overtighten—you can crack the housing.
Critical alignment steps at this stage:
- The projector lens should face exactly forward, not angled up/down or left/right.
- The cutoff shield (visible inside the projector) must be horizontal. Use a small level across the projector face to verify.
- Depth matters: The projector lens should sit slightly recessed behind the outer clear lens of your headlight—typically 5–10mm. Too far forward and it touches the outer lens (causes heat damage). Too far back and you lose light output.
If your housing originally used a bulb with a dust cap, you may need to drill or modify the cap to accommodate the projector’s rear heat sink and fan. Our GTR kits include a rubber grommet to seal around the wiring exit.
“Based on our engineering measurements, even 2mm of projector misalignment can shift the hot spot 15 feet off-center at 100 meters. Take your time on mounting. Use washers to shim if needed.”
Step 4: Wire the Bi-LED Projector Correctly
Your bi led projector lens retrofit kit will have three wires: low beam positive, high beam positive, and ground (common negative).
-
- Identify your vehicle’s headlight wiring: Use a multimeter to find which factory wire supplies low beam 12V, high beam 12V, and ground.
- Crimp matching connectors onto the projector wires. Use heat shrink for waterproofing.
- Connect low beam positive to the factory low beam wire. Connect high beam positive to the factory high beam wire. Connect ground to the common ground (usually black wire).
- Test before sealing: Reconnect the battery (temporarily) and trigger low beam, then high beam. The projector’s solenoid should click audibly when switching from low to high. If no click, swap high beam and ground—some vehicles have switched ground systems.
If your vehicle uses PWM (pulse-width modulation) for daytime running lights, you may need a CAN-bus decoder or resistor to prevent flickering. GTR kits include anti-flicker modules for problematic models (check our website for your vehicle compatibility).
For a detailed explanation of automotive lighting electrical standards, refer to SAE J578 color and photometric specifications.
Step 5: Reseal Your Headlight Housing
This step separates a professional retrofit from a foggy, failed one.
-
-
- Remove all old butyl rubber sealant from both the housing channel and the lens. Use a plastic scraper—metal scratches the plastic.
- Apply fresh butyl rubber rope sealant into the housing channel. Press it firmly into the corners.
- Reheat the housing (heat gun, 300°F) until the butyl becomes tacky.
- Press the lens back onto the housing. Use clamps or heavy tape around the perimeter to hold tension.
- Let cool for 30 minutes. Remove clamps. Inspect the seal—no gaps larger than 1mm anywhere.
-
“We have seen more retrofits ruined by water ingress than by any other cause. Skipping the resealing step or reusing old sealant guarantees condensation inside the lens. That kills your beam pattern and corrodes the solenoid.”
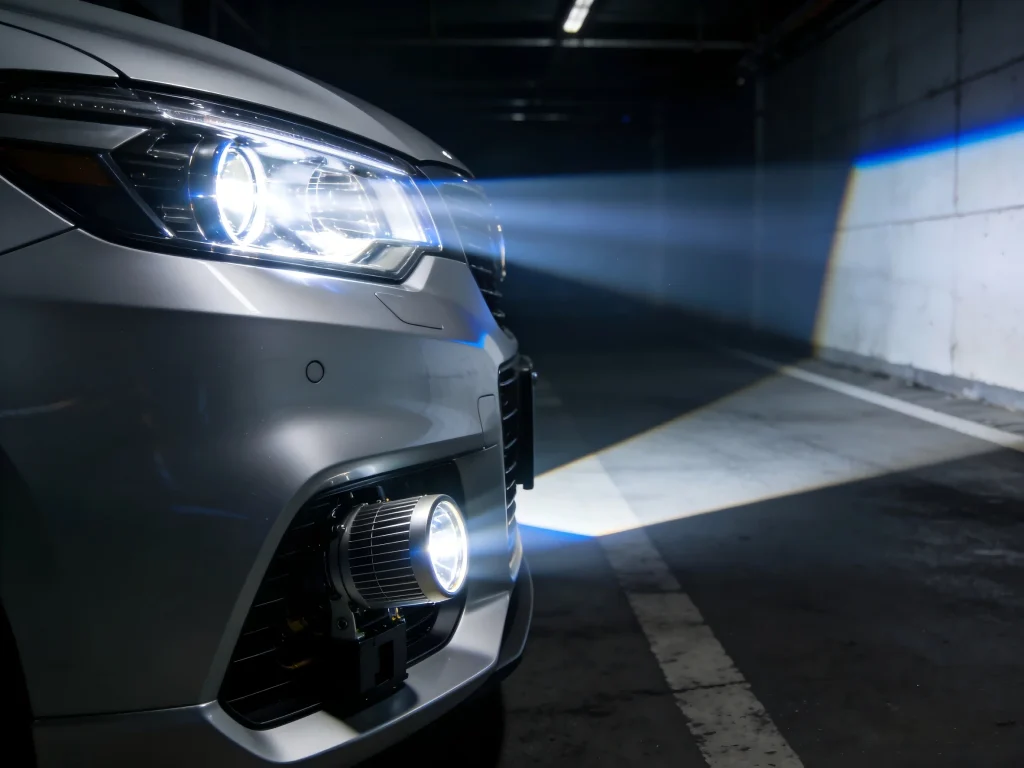
Step 6: Aim Your Bi-LED Projector Legally and Safely
Even the best bi led headlight projector lens will blind oncoming traffic if aimed incorrectly. Aiming is non-negotiable for safety and legality.
-
-
- Park on level ground exactly 25 feet from a flat wall.
- Mark the vertical centerline of your vehicle on the wall with tape.
- Measure from the ground to the center of each headlight lens. Mark that height on the wall.
- Turn on low beams. The top edge of the sharp cutoff line should fall 1–2 inches below the headlight center height.
- Adjust using your vehicle’s factory headlight aim screws (vertical and horizontal).
-
If you cannot achieve a level cutoff line, your projector may be rotated slightly. Go back to Step 3 and correct the rotation.
Real-World Results: What a Proper Retrofit Looks Like
After completing a 2.5 inch bi led projector lens headlight retrofit kit installation, customers report:
-
-
- “The width is incredible—three full lanes illuminated evenly.”
- “No glare complaints from other drivers after aiming it correctly.”
- “High beam now reaches past 500 meters on rural roads.”
- “The solenoid click is satisfying and reliable.”
-
One forum member on TacomaWorld wrote after a GTR retrofit: “The cutoff is razor sharp. I can see road signs reflecting from half a mile away. Best mod I have ever done.”
Conversely, the most common mistake we see in forums is using a bi led headlight projector lens kit without proper aiming. “Great output but everyone flashes me” almost always traces to a vertical aim that is 3–4 inches too high at 25 feet. Lower the cutoff line to 1–2 inches below headlight height, and those flashes stop.
Frequently Asked Questions From DIY Retrofitters
Q1: Can I retrofit Bi-LED projectors without baking my headlights?
Some aftermarket headlight housings use removable lens screws or clips. But 95% of OEM headlights are permanently sealed with butyl rubber. Baking or heat gun is required. Do not attempt to pry open cold—you will crack the lens.
Q2: How do I know if my housing has enough depth for a 2.5-inch Bi-LED projector?
Remove your old bulb. Insert a stiff wire through the hole until it touches the back of the housing. Mark depth. A 2.5-inch projector needs at least 90mm from the bulb seat to the back wall. If you have less, consider 1.8-inch projectors.
Q3: My Bi-LED projector high beam works, but low beam flickers. What is wrong?
Likely a poor ground connection or vehicle PWM interference. Check ground wire resistance. If ground is solid, install a CAN-bus decoder or resistor (available from GTR).
Q4: Do I need a relay harness for my Bi-LED projector retrofit?
Most modern vehicles can handle the additional 35–50W per side directly. But older vehicles (pre-2005) or those with known weak headlight circuits benefit from a relay harness that draws power from the battery and uses factory signals as triggers only.
Q5: How do I prevent fogging after resealing?
Use desiccant packs inside the housing before final sealing. Also, ensure your housing has a functional breather vent (most OEM housings have small rubber tubes or caps). Never seal the housing completely airtight—temperature changes will cause internal condensation.
Q6: Can I aim Bi-LED projectors by myself without special tools?
Yes. Tape measure, level, wall, and masking tape are all you need. The 25-foot aiming procedure described above is the same method professional shops use. It takes 15 minutes and requires no expensive equipment.
Q7: What is the difference between a clear lens and a “stepped” lens on a Bi-LED projector?
Clear lenses produce a sharper cutoff with more color fringe (blue/purple edge). Stepped lenses (with horizontal ridges) diffuse the cutoff slightly but reduce color fringe. Both are acceptable. GTR uses clear lenses for maximum sharpness.
Q8: How long should my Bi-LED projector last after a proper retrofit?
With adequate thermal management (the aluminum heat sink and fan in quality kits), you can expect 30,000–50,000 hours. That is the equivalent of driving 4 hours every night for 20+ years. The retrofit itself will outlive your car.
Your Next Step: Get the Right Kit for Your Vehicle
You now have the complete workshop-proven process for a bi led headlight projector lens retrofit. The difference between a frustrating weekend project and a successful upgrade comes down to two things: using a quality bi led projector lens retrofit kit and following each step without shortcuts.
GTR’s 2.5-inch Bi-LED projector kits include everything you need: precision glass lenses, copper-core cooling, threaded-shaft mounts, and DOT-compliant cutoff shields. We also provide model-specific wiring guides and 24/7 technical support for DIY installers.
Do not gamble with cheap knockoffs that fail after one winter or produce illegal glare patterns. Retrofit once. Retrofit right.
Visit https://www.rhgtr.in to see our full bi led headlight projector lens catalog. Use the vehicle fitment tool to find the exact kit for your car. Free shipping and lifetime technical support included.
Still unsure about your housing depth or wiring? Our team replies to every inquiry within 12 hours. Start your retrofit with confidence.